Today I went to my Quilt History
study group where we were shown
some wonderful vintage quilts!
One of my favorites! A crazy quilt
made about 1850 in Philadelphia.
The stitching is beautifully done!
Almost every square was done with
the Broderie Perse technique using
beautiful chintz fabrics.
I can image all of the time, work
and effort put into this treasure!
Wednesday, January 13, 2016
Monday, January 11, 2016
Naturally Dyed - Eco Dye
A couple of years ago I started
to dye fabric with plant material.
Many of them were dyed with fallen
leaves or leaves that I took off
some of the trees in my backyard.
It's very addicting! So I decided
to destash and sell some pieces
in my Etsy shop.
The plum colors were dyed with the
fallen leaves and the deep beige color
is from Oak. The doily came out great!
Crochet doily 5 1/2" x 5 1/2"
other pieces measure
9" x 12", 11 1/2" x 13", 8" x 10 1/2"
Great pieces for your fiber art, slow cloth,
Boro cloth or art quilt.
I made a needle case with some of
the fabric.
And a zippered pouch.
Have fun creating!
Labels: paints, setaColor, fabric painting
eco dyeing,
Natural dyes
Tuesday, January 5, 2016
Image Transfer - easy!
A couple of years ago; I got this idea
in my head after reading some image
transfer techniques. I'm lazy; I wanted
something easy and not have to go out
to get an image printed somewhere else.
And using what I had in my house.
I searched google to see if anyone had
this idea before but I found nothing.
So I started experimenting.
This is a photo that I did back in March 2010. It's a black and white photograph of my Aunt from the 1940s. This was one of my first experiments that I did with Shout Stain
remover. Yes, it works!
And another from the same years - of the dragon - both using my hand dyed fabrics.
They are still in great shape as the day
I transferred them.
I made a tutorial in case you would
like to try this technique for your
projects.
Ready?
I suggest making a few samples pieces first just to get the hang of it and experiment.
Supplies needed
Background fabric (I suggest a light color)
Burnishing tool (old credit card)
Freezer paper
Regular printing paper
Paper or plastic cup
Paint Brush (or I even tried Q-tips)
Shout (stain remover)
A black and white image - if you don't have your own image; you can get one from http://thegraphicsfairy.com/

A printer that uses dyed-based inks. If you have a printer with pigmented inks; this method will not work.
For example: I use my old HP PSC 1400 series - my Epson has pigmented inks
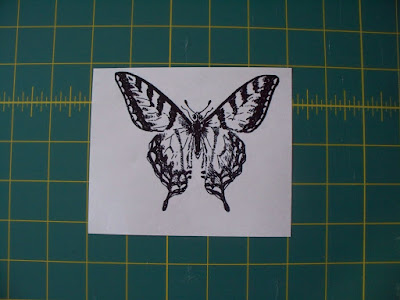
1 - Print the image on white printing paper
Cut around the images leaving a space all around.
I suggest using a small sized image to practice.
I printed my images 3" x 5" on regular printing paper
2 - Cut 2 pieces of freezer paper at least 2" larger than your image. (the bottom piece
can be larger)
Lay down the freezer paper shiny side down. This is done to ensure that the dye doesn't stain your table or whatever surface you are working on.
3 - Lay down your fabric - right side up - on top of the freezer paper. (I'm using fabric that I dyed naturally with Oak leaves
and oak bark)
4 - Now lay down your image - right side down on top of the fabric. (make sure it's centered where you want it.
5 - Spray the Shout into a plastic cup - make sure that you have enough to cover the image.
6 - Dip the paintbrush into the shout but not too much as to make it puddle. (this will tear the paper and smudge if it's too much)
Now with slightly hard dabs, cover the image with the paintbrush making sure that the whole image is covered. You might have to dip the brush back into the Shout again.
7 - Put the other piece of freezer paper on top of the image (shiny side down) I do this because it lessens the chance of the image paper tearing.
8 - This is the part that takes patience and practice. Use an old credit card (or AAA) as a burnishing tool and pressing
down hard but gently - go back and forth over the image making sure that you burnish
the entire image. Tip - hold down the
paper with one hand so that nothing
slides around. I start at the right side
and work my way across.
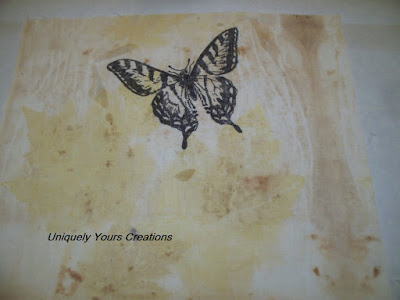
9 - Then lift the paper off of the fabric
Please don't get upset or lose heart
if the first one doesn't work.
Like mine here---
You can see on the left side of the bottom wing - I missed a part!
Like I said before; it takes patience and practice but it does work.
Let the fabric dry and then with a warm
to hot iron (no steam) go over the printed fabric on the wrong side. This is heat
setting the dye.
And it's ready for your project!
Imagine and create something beautiful!
in my head after reading some image
transfer techniques. I'm lazy; I wanted
something easy and not have to go out
to get an image printed somewhere else.
And using what I had in my house.
I searched google to see if anyone had
this idea before but I found nothing.
So I started experimenting.
This is a photo that I did back in March 2010. It's a black and white photograph of my Aunt from the 1940s. This was one of my first experiments that I did with Shout Stain
remover. Yes, it works!
And another from the same years - of the dragon - both using my hand dyed fabrics.
They are still in great shape as the day
I transferred them.
I made a tutorial in case you would
like to try this technique for your
projects.
Ready?
I suggest making a few samples pieces first just to get the hang of it and experiment.
Supplies needed
Background fabric (I suggest a light color)
Burnishing tool (old credit card)
Freezer paper
Regular printing paper
Paper or plastic cup
Paint Brush (or I even tried Q-tips)
Shout (stain remover)
A black and white image - if you don't have your own image; you can get one from http://thegraphicsfairy.com/

A printer that uses dyed-based inks. If you have a printer with pigmented inks; this method will not work.
For example: I use my old HP PSC 1400 series - my Epson has pigmented inks
1 - Print the image on white printing paper
Cut around the images leaving a space all around.
I suggest using a small sized image to practice.
I printed my images 3" x 5" on regular printing paper
2 - Cut 2 pieces of freezer paper at least 2" larger than your image. (the bottom piece
can be larger)
Lay down the freezer paper shiny side down. This is done to ensure that the dye doesn't stain your table or whatever surface you are working on.
3 - Lay down your fabric - right side up - on top of the freezer paper. (I'm using fabric that I dyed naturally with Oak leaves
and oak bark)
4 - Now lay down your image - right side down on top of the fabric. (make sure it's centered where you want it.
5 - Spray the Shout into a plastic cup - make sure that you have enough to cover the image.
6 - Dip the paintbrush into the shout but not too much as to make it puddle. (this will tear the paper and smudge if it's too much)
Now with slightly hard dabs, cover the image with the paintbrush making sure that the whole image is covered. You might have to dip the brush back into the Shout again.
7 - Put the other piece of freezer paper on top of the image (shiny side down) I do this because it lessens the chance of the image paper tearing.
8 - This is the part that takes patience and practice. Use an old credit card (or AAA) as a burnishing tool and pressing
down hard but gently - go back and forth over the image making sure that you burnish
the entire image. Tip - hold down the
paper with one hand so that nothing
slides around. I start at the right side
and work my way across.
9 - Then lift the paper off of the fabric
Please don't get upset or lose heart
if the first one doesn't work.
Like mine here---
You can see on the left side of the bottom wing - I missed a part!
Like I said before; it takes patience and practice but it does work.
Let the fabric dry and then with a warm
to hot iron (no steam) go over the printed fabric on the wrong side. This is heat
setting the dye.
And it's ready for your project!
Imagine and create something beautiful!
Labels: paints, setaColor, fabric painting
Image Transfer,
Shout Stain Remover
Tuesday, December 1, 2015
Art Quilting Studio
I am so excited - I am in Art Quilting
Studio magazine - Winter 2016 issue!
There are so many beautiful quilts
in this issue and I can't believe
that I'm a part of it.
Here I Am!
In this article I explain how I
discovered an easy way to do image
transfer onto you fabric using your
home printer.
When I first discovered this method;
I searched and searched the internet
to see if anyone had done it this way.
Nope
It's so easy and you use your home
printer but it has to have dye-based
inks not pigment based inks. It won't
work with pigment based inks but you'll
have to buy the magazine to find out
how I did it.
I experimented with this method for
a couple of years and the images are
still very good!
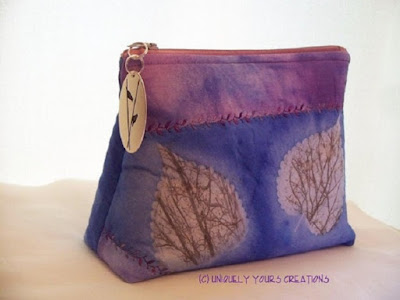
One of the first images I used was
on this zippered pouch.
Hope that you will buy the magazine
and try it for yourself - it's fun!
Happy Quilting!
Thursday, November 5, 2015
I'm a member of a local Quilt History Study
Group; so Antique quilts inspire me.
I made this little doll quilt with
a matching tote. It's styled after
an Antique Medallion doll quilt
It measures 14" x 14" and I hand
quilted it only in the ditch. Doing
that gives the quilt a nice puffy look.
I love the fabric in this quilt; the
only problem is that I bought it as
a remnant and the selvage was cut off.
I'm in love with such treasures from the
past!
This would make such a cute gift for
a girl of any age.
Living here in Lancaster county; I'm
always inspired by Amish, Mennonite and
Vintage quilts.
I made this small wall hanging which
measures 21" x 21".
Pinwheel is the center design which has
printed fabric; unlike the Amish that use
mostly solids - it is machine quilted with
a more modern quilting design - Amish quilts
are hand quilted with feathers, flowers or
other motifs.
Both are for sale in my Etsy shop.
(see side bar)
Happy Quilting!
Labels: paints, setaColor, fabric painting
Amish Style Quilt,
Doll Quilt Set
Thursday, October 22, 2015
I haven't made anything for Christmas
in a long time.
I decided to make a Christmas tree
Table topper.
I didn't have a pattern and decided just
to design it as I went.
This is what I came up with.
It's Modern and the quilting is geometric
designs. Also, it has lots of gold thread
running through. I'm happy with the way
it came out.
I'm also having fun designing Kids snack
mats; The mini totes can be used for
a Gift card holder or Utensils holder
for the mat.
This fabric is out of print; I think its
so adorable! Wish I had more of it.
And this Scotty dog fabric is just so
cute! Also out of print.
All available at my Etsy shop.
Happy Quilting!
Labels: paints, setaColor, fabric painting
Christmas Table Topper
Saturday, September 12, 2015
Subscribe to:
Posts (Atom)


