Tuesday, July 28, 2009

Dylon Dyes

We have had so much rain and when
it's not raining it's very windy. Not
good days for me to dye fabric.

Today is a good day and I'm taking
advantage of it!


I dye fabric on my deck and use lots of
drop cloths. Messy ain't it? But it's also
so much fun.

Today I tried Dylon Dye. I have wanted to
try this dye ever since reading about it on
Trish's blog Hand Dyed Fabric & Threads.

Normally I used SetaColor paints as
a dye because I'm intimidated by powdered
dyes. But I found the Dylon dye very easy
to use.

So today I tried "Burnt Orange" and here's
the results:


See that white piece of fabric in there? The package
said NOT suitable - Pure polyester but did I listen?
This polyester had a silk finish so I just wanted
to test it. As you can tell it didn't take the dye.


Hanging out to dry.


#2 is unbleached muslin - it absorbed more
of the dye - it's much darker
#3 is cotton broadcloth - much lighter
#1 - After #2 &3 was sitting in the dye bath
for one hour - in what was left I put #1 into it.

I like how it came out in different shades.
With one package I used 3 one quarter yards
of fabric. I have another piece one-eighth
of a yard that I experimented
with and was disappointed with the results.

Here's what I did:

I sewed the ends to make it a shibori and then
I folded the fabric and poured the dye on top.
(This was the left over dye)


You can't see where I sewed but you can see
somewhat of where I folded.


In case you're not familiar with what I mean by
Shibori - here's one that I did last year.


You can see where I stitched the fabric and
then pulled on the thread to bunch it up.
This was done with the SetaColor paints.

I don't know why it didn't work with the
Dylon.
If the weather holds out; I'll try to dye
more fabric this week with the other
colors that I bought.


Thursday, July 16, 2009

I'm Back!

Hi, sit down and relax - this is a long
one. I have to make up for lost time. (-:

I didn't go on a real vacation; just relaxing,
regrouping and playing tourist.

A friend told me about a really great
restaurant along the Susquehanna
River, where you dine outside under
a large tent. As a former Long Islander;
I miss the Atlantic Ocean! For lunch
we had hot pastrami on rye - another
New York thing! I felt as if I was right
at home.


How's that for a view? Nice, calm and relaxing.


See this bridge? If you click on the photo; I outlined
where the old bridge was. There is a plaque which
says:
In 1814, the first bridge connecting
Wrightsville and Columbia was completed.
It was the longest covered bridge in the
world (5,690 feet.) Since then, five additional
bridge have spanned the Susquehanna at this site.
Of the six, two were destroyed by natural
forces, and one was burned in 1863 by Union
militiamen and townspeople to prevent
Confederate troops from invading Lancaster
County and reaching Harrisburg.


My daughter came from N.Y. twice; once with
her hubbie and once by herself. We went
and hit the outlets! Guess where we're headed?

I also had another visitor; one with four legs:


I was out early one morning cleaning out the
weeds in my tomato garden and when I looked
up I got the shock of my life! A deer was just
standing there looking at me. He didn't move
for at least 5 minutes. So I ran inside and got
my camera and it stood there and posed for
this photo.
What can I tell you..
first the ground hog now this! I hope this
deer doesn't get any ideas and eat my stuff!
It's cute though, isn't it?

Now the quilty stuff. I joined Facebook
awhile back and became a fan of
Pat Sloan. One of the discussions
is: My First Quilt.
Pat posted hers
on her web site and some of the other
brave ladies did also. They are really
nice for a first quilt.
You can view
Pat's first quilt and her story
here

It's really funny and I love how she
did the back of her quilt! I couldn't
stop laughing. So anyway, I thought
I would also post my first quilt but first
let me tell you about it.
When I first moved here I wanted to
learn how to quilt. My sister told me
to look in the mail for the Adult Ed classes.
The day that I received it; I filled out the
form and signed the check and had it in
the mail the same day. I didn't really read
what the class entailed; I was just so excited
to take my first quilting lesson!
When I got to the class; I found out it was
applique and my heart sank but I was
determined to do this no matter what.
It was an "Baltimore styled Album Quilt".
I had no supplies so I had to get the "works" -
cutter, board, rulers, scissors etc.; I spent
over $300.00! I had to do this quilt!

It looks kinda nice if you look at it from
far far away...
The first block we did was the tree with
the cherries. First I practiced the leaf
before I did it on the block. My nephew
was visiting and he came over and said
to me "What the heck is that?!" I said,
trying to hold back my annoyance (what
is he stupid?) "It's a leaf" (smile)
"Well it doesn't look like one" I told him
to go back and play his computer games.
hmmmf
My instructor said that applique is
very forgiving and that if you make
a mistake you can make fudge. ???
Cover it up -- and that's exactly what I
did. If you look at the block with the
cherries; I made a booboo at the bottom
of the vase; so I added another leaf
and cherry to cover it up. My instructor
Marge came over and looked and with
a smile she said "ah you made a mistake";
I said "No, I made fudge."


I can't believe I'm showing this!
For the cherries; we used a quarter.
(5 yrs. later - I now know about Karen
Kay Buckley's "Perfect Circles")
The method that I learned for this
applique is with freezer paper.
You make your cardboard template;
then trace around it on freezer paper
and cut.
(5 yrs. later - I now know about
back basting - thank you Jeana Kimball!)
I can't believe those leaves.


We were told that we were going to make
mitered corners. (haha) I watched, I saw,
and I did the first one good. When I went
home and try to do the others; I had to
make fudge! I wanted to save face; so
I looked through several magazines and
found the bird and covered my mistakes!


Also learned how to make different 3-d
flowers. Not too bad.

I also learned a lesson. Never use dark thread
for quilting...unless you are a very good quilter..
or stupid.


There was a applique pattern to go all
around the border but by this time I was
too frustrated to do it; I just wanted to get
it done.

The best is yet to come.


For tracing the pattern on fabric we
used
a pencil. I found out that this
doesn't
wash out. Now I use one of
those pens
that the ink washes out
very easily.

This is the end because I can't
seem to adjust the font size.


Thursday, June 4, 2009

Updates


Ha, I think I finally have gotten rid of
the pesky little fat gopher!
Probably a male.
I saw him come out of his tunnel
(food hunting no doubt) and so I
immediately ran over and put a huge
piece of slate over the hole! Yeah me!
So far he hasn't tried to dig around it
(fingers crossed)


Bush Fire Quilt Project: My blocks are in
each corner and one in the middle. Yeah!
It's the first quilt on the top. Thank you
Tia for doing this project. The quilts are
just wonderful!
click here


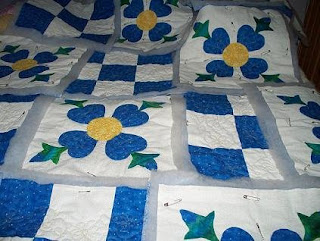
I have a Ta Da moment to share! I have
finally finished my Rose of Sharon quilt
Here it is:


Here's the back. You really can't see the seams.

It only took me a little over four years to complete.
Here's the story - which was on
a previous post.
I learned a lesson doing this quilt. Never take apart
a quilt top that has been lying around for four years.
As I was still an inexperienced quilter; I bought the
cheapest white fabric from Joanne's store. Well,
what happened was when I went to free motion the
squares; the fabric was stretching! The result was
some puffyness in areas. Not a good thing.
Nevertheless, I'm happy that it's finished and ready
to bring to my Guild meeting next week for the UFO
challenge. (and to collect my prize!)
I think it's very pretty and of course my daughter
Lisa wants it. (daughters want everything (-: !)


The free motion design is compliments of
Patsy Thompson Designs
Thank You Patsy! I first discovered Patsy on
"youtube.com" looking for free motion demos. Free
motion is still new to me. I try to practice as much as possible.


I did "Quilt as you go" after reading
Quilters Cache
Practice first on some spare UFO
blocks that you may have around (somewhere -: )


Sunday, May 10, 2009

Happy Mother's Day!


When I moved here about 7 yrs. ago - these irises were
almost dead. I found them under a large furry bush.
So I separated the rhizomes and moved them under
a maple tree that gets just a little of the south sun.
This is the first year that they look so healthy.
I almost gave up on them blooming.
Now I think they are healthy enough to be
divided and transplanted in different areas in my
garden.

In between planting six Sally Holmes rose
bushes which my daughter gave me for Mother's
day - pruning the lavender plants along the
walkway - putting down 9 bags of mulch - (groan)
I have been working on my Rose of Sharon quilt;
which is due at next month's guild meeting.
In January I signed up for a UFO challenge and
we had until the June meeting to finish it.
This poor neglected quilt has been sitting around for
over 4 yrs. now. It was originally sewn as a quilt
top and my plan was to hand quilt it. I then decided
to take it apart and do it as a quilt-as-you-go.


This photo was taken two weeks ago and I have since
finished all of the free motion quilting on all of the blocks.

(Unfortunately, my batteries died in my camera and I don't have
an updated photo.)
Progress is slow but I'm getting there! I have two rows
sewn together so far.
I have 4 more weeks to finish it ! (fingers crossed)

Do something wonderful today just for yourself -
Happy Mother's Day!
(it's okay really)


Monday, April 6, 2009

Improvisational Quilts 4

Spring is finally here and I have a list of
things "to do". So much so that I don't
know where to begin. I started to clean
out my sewing room (for the umpteenth)
time and decided to use up the scraps that
I have left over from the "Zig Zag" quilt.
It wasn't enough - so I pulled out some
fabric from my stash.


I recently became of fan of Nancy Crow. In reading
her Artists statement "When I work on a quilt, I put
away all thoughts that are not helpful and channel
my energies towards relaxing and becoming one
with my fabrics."
This has become my "Mantra".

The black and white Zebra print is kinda bold but
I thought that if I had not added it - it would not
have made a "statement"! What I mean by that
is, the other colors blended too well together
and were getting lost in each other. (hope that
makes sense)


I also used the yellow with the black and white - I love
the way the yellow brightens up the areas.
So far this is my favorite of the improvisational quilts
that I've done. It has the three B's .... Big, Bold and Bright!

Now I have left over scraps from this quilt...

Monday, March 30, 2009

Zig Zag Quilt

Since I first discovered blogs several months
ago; I have bookmarked those who have
tutorials or projects that I would love to do.

I found this Zigzag quilt over at "A Quilt
Is Nice" blogspot.
It's done with half square
triangles. So last week when Joanne's store
was having a sale on fat quarters; I went
and bought a bunch.


It's one of those quilts that is really prettier in person.
I love the colors and decided that a little black and
white would look good in it.

I went to my favorite fabric shop "Zooks" to buy
the black and white fabric and some yellow for the
back. They told me that black and white and yellow
are the "in" thing this year. I also met some ladies
that came from Virginia - just to buy fabric!


I then thought that I would quilt it on the machine
using a "half circle" design - it's a decorative stitch.
Well, that's when the problem arose of puckering
in the back! I pressed and went on; the result
was the quilt was a little distorted but thought
I could live with that. Next time I'll be on guard.


You can see the stitch here in the above photo. I used
variegated thread.
When I was at Joanne's store; I saw batting that was
iron on. Never tried that before and just might use
my 40 % off coupon to buy it. I would use it on a
small project just to see how it works. Thinking that
it would not cause the puckering.
I'm wondering if it puckered because of the circled
stitch? I normally hand quilt but decided to do
the machine quilting and get more experienced
at it.

I made this little lap sized quilt for my daughter's
niece (in-law) when she sleeps over at her
house.

Monday, March 16, 2009

Weaving


This past week I took a class from my Guild ~
The Red Rose Quilters Guild with Ellie Levie
It was a new technique for me and thought it would
be fun to try. The above picture is all of our blocks
put together. My part in the process was to
applique the rose and the leaves in the center.
I draped some red tulle over it in order
for the free motion quilting to go easier. Then another
Guild member will add on the borders and yet another
one will finish the entire quilt.

The strips were cut 1" and 1 1/4". We also added
ribbons, rick rack, braiding and some lace for
different textures.


The first thing that we did was lay down and pin the vertical strips.


Then we added the horizontal strips. There are
technical terms for this process but I can't
remember them now. ( senior moment)


The blocks were worked as light, medium and darks.


We did audition a couple of different color
backgrounds but we decided the black looked
best. It really brings out the colors. We decided
to add a focal point - the red rose - for Lancaster
County - of course!
The wheels are turning in my mind for different
quilt projects that I can use this technique.
This quilt when finished will be donated to
an organization - who? - we haven't decided that
yet.